

ROLO MobileTek Driver Training • Lesson 2 of 9
Lesson 2: Accept Your Route
Use the Load Vehicle icon, scan your assigned packages, commit your load scans, and confirm your scheduled deliveries before leaving.
Your route is not ready until your assigned packages are scanned, your load scans are committed, and your scheduled orders appear in MobileTek.
Why This Matters
Accepting your route correctly confirms that your packages are loaded, scanned, and connected to your scheduled deliveries. This gives dispatch visibility and helps prevent missing packages, wrong packages, delayed stops, and route confusion.
Load Vehicle → Scan Packages → Green Scans → Done → Commit Load Scans → Scheduled Orders
Look at This
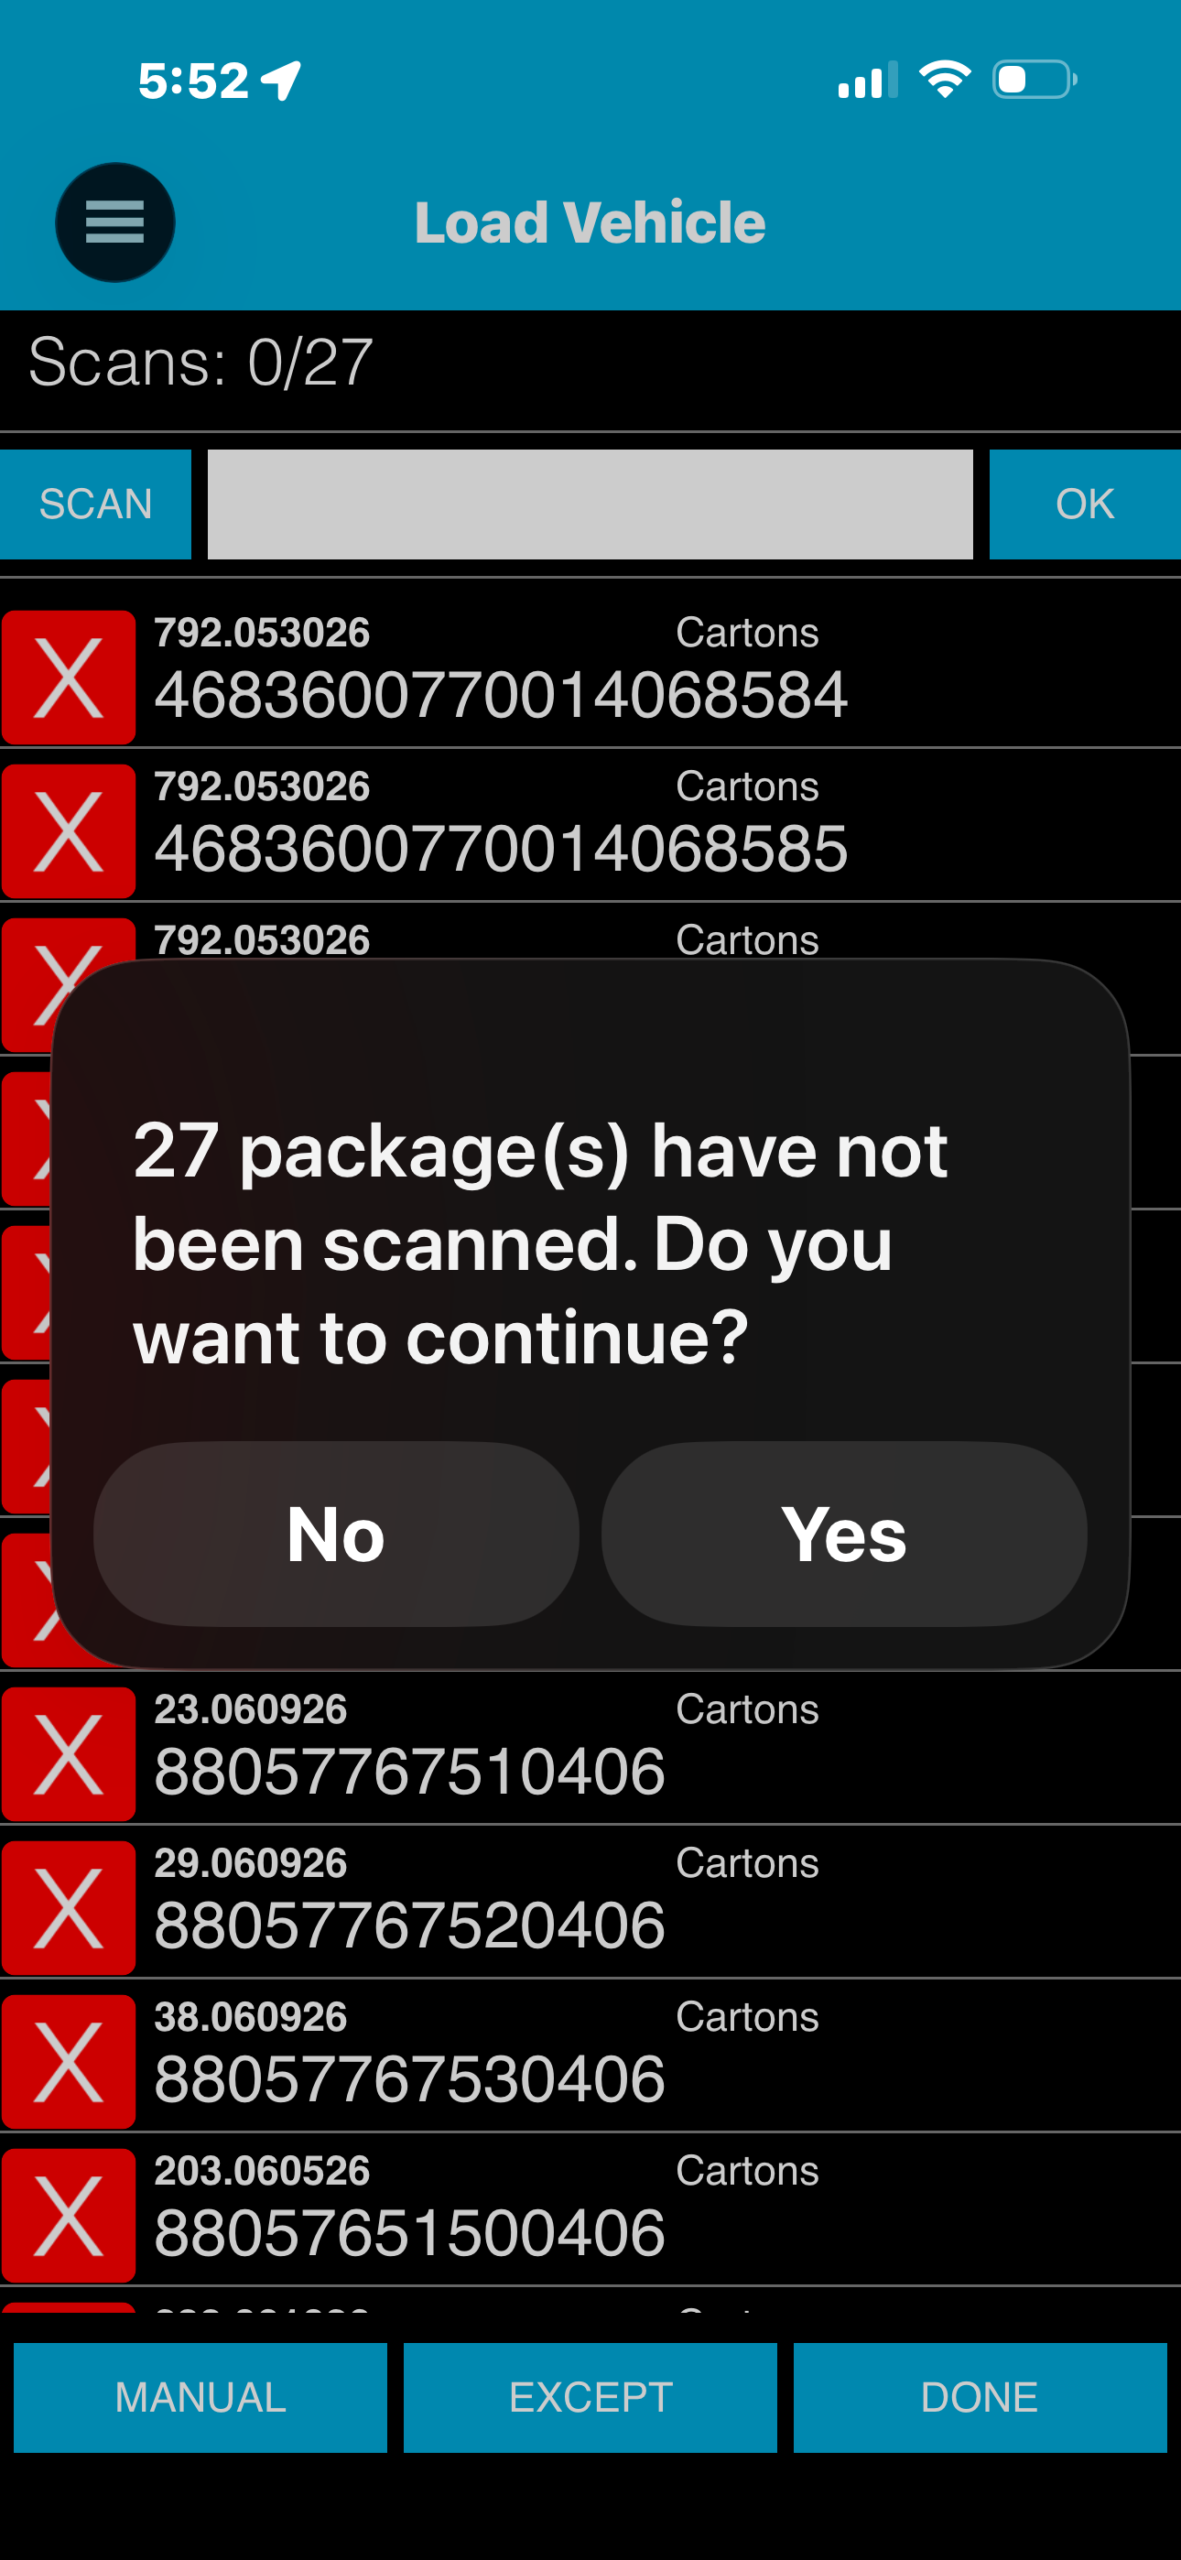
Load Vehicle screen
Do These Steps
- Open MobileTek.
- Select the Load Vehicle icon.
- Tap the Scan button.
- Scan each package assigned to your route.
- Make sure each package shows a green scan. Green means the scan registered correctly.
- Continue scanning until all packages left for your route have been scanned.
- When finished, tap Done.
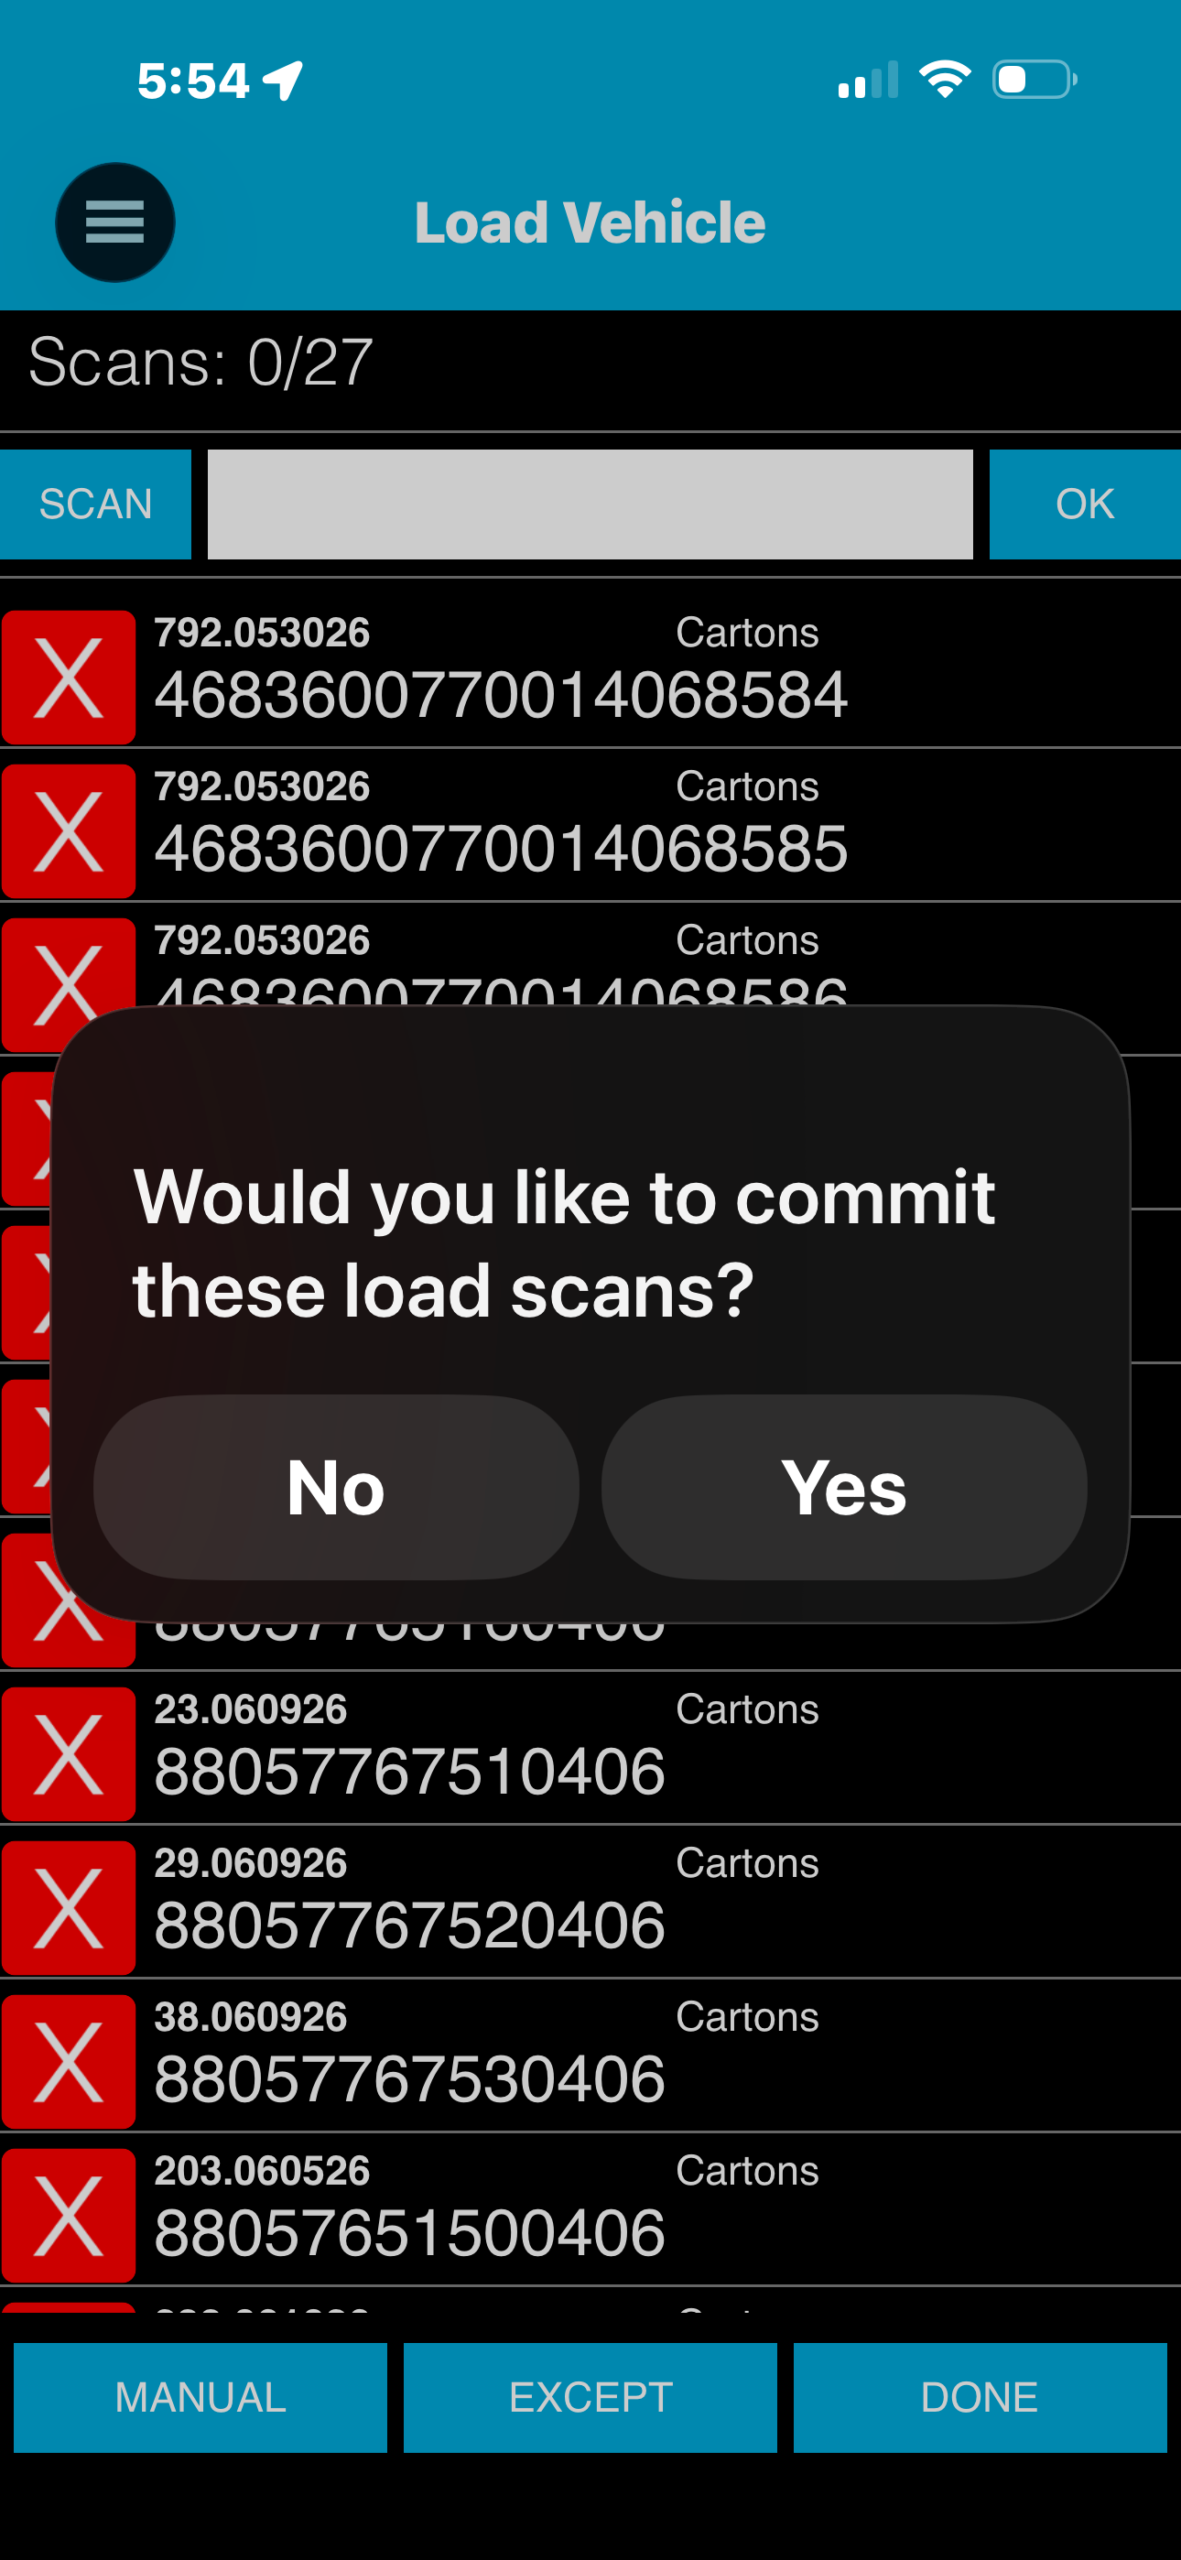
- When the pop-up appears asking, “Would you like to commit these load scans?”, select Yes.
- If MobileTek says some packages have not been scanned and asks if you want to continue, select Yes.
- Wait for MobileTek to refresh.
- Open Scheduled Orders to confirm your deliveries are lined up.
- Once your scheduled deliveries appear, you are ready to move on to the map and navigation workflow.
ROLO Standard:
Do not leave until your load scans are committed and your scheduled deliveries appear in MobileTek.
Do not leave until your load scans are committed and your scheduled deliveries appear in MobileTek.
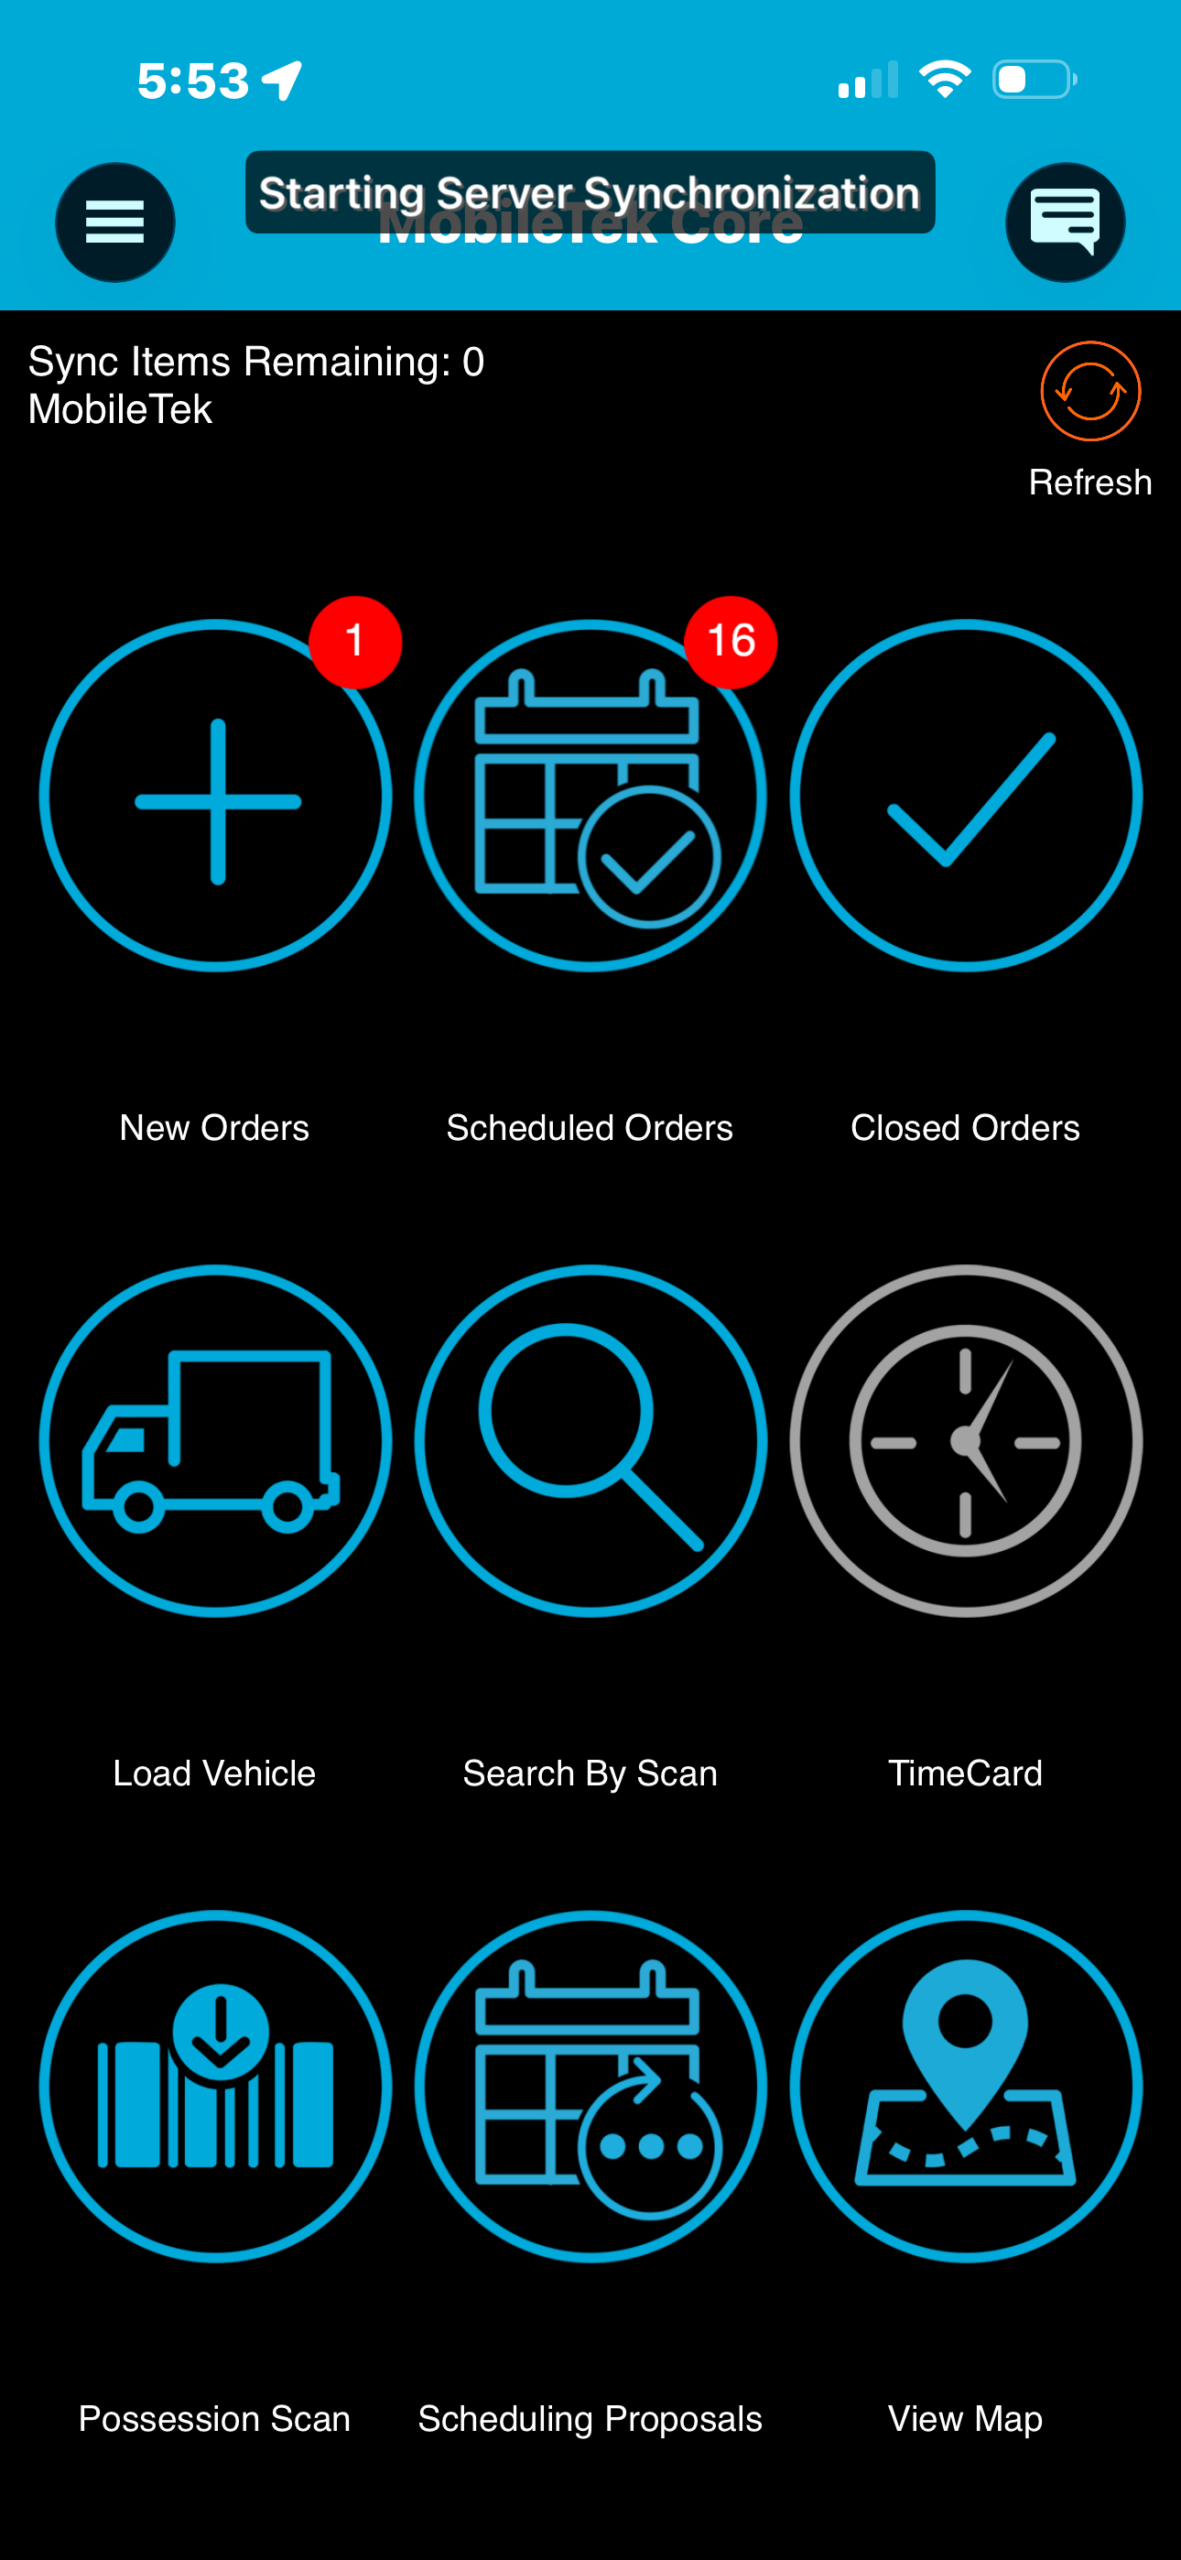
Step Example: Select Load Vehicle
Use the Load Vehicle icon to begin scanning packages assigned to your route.
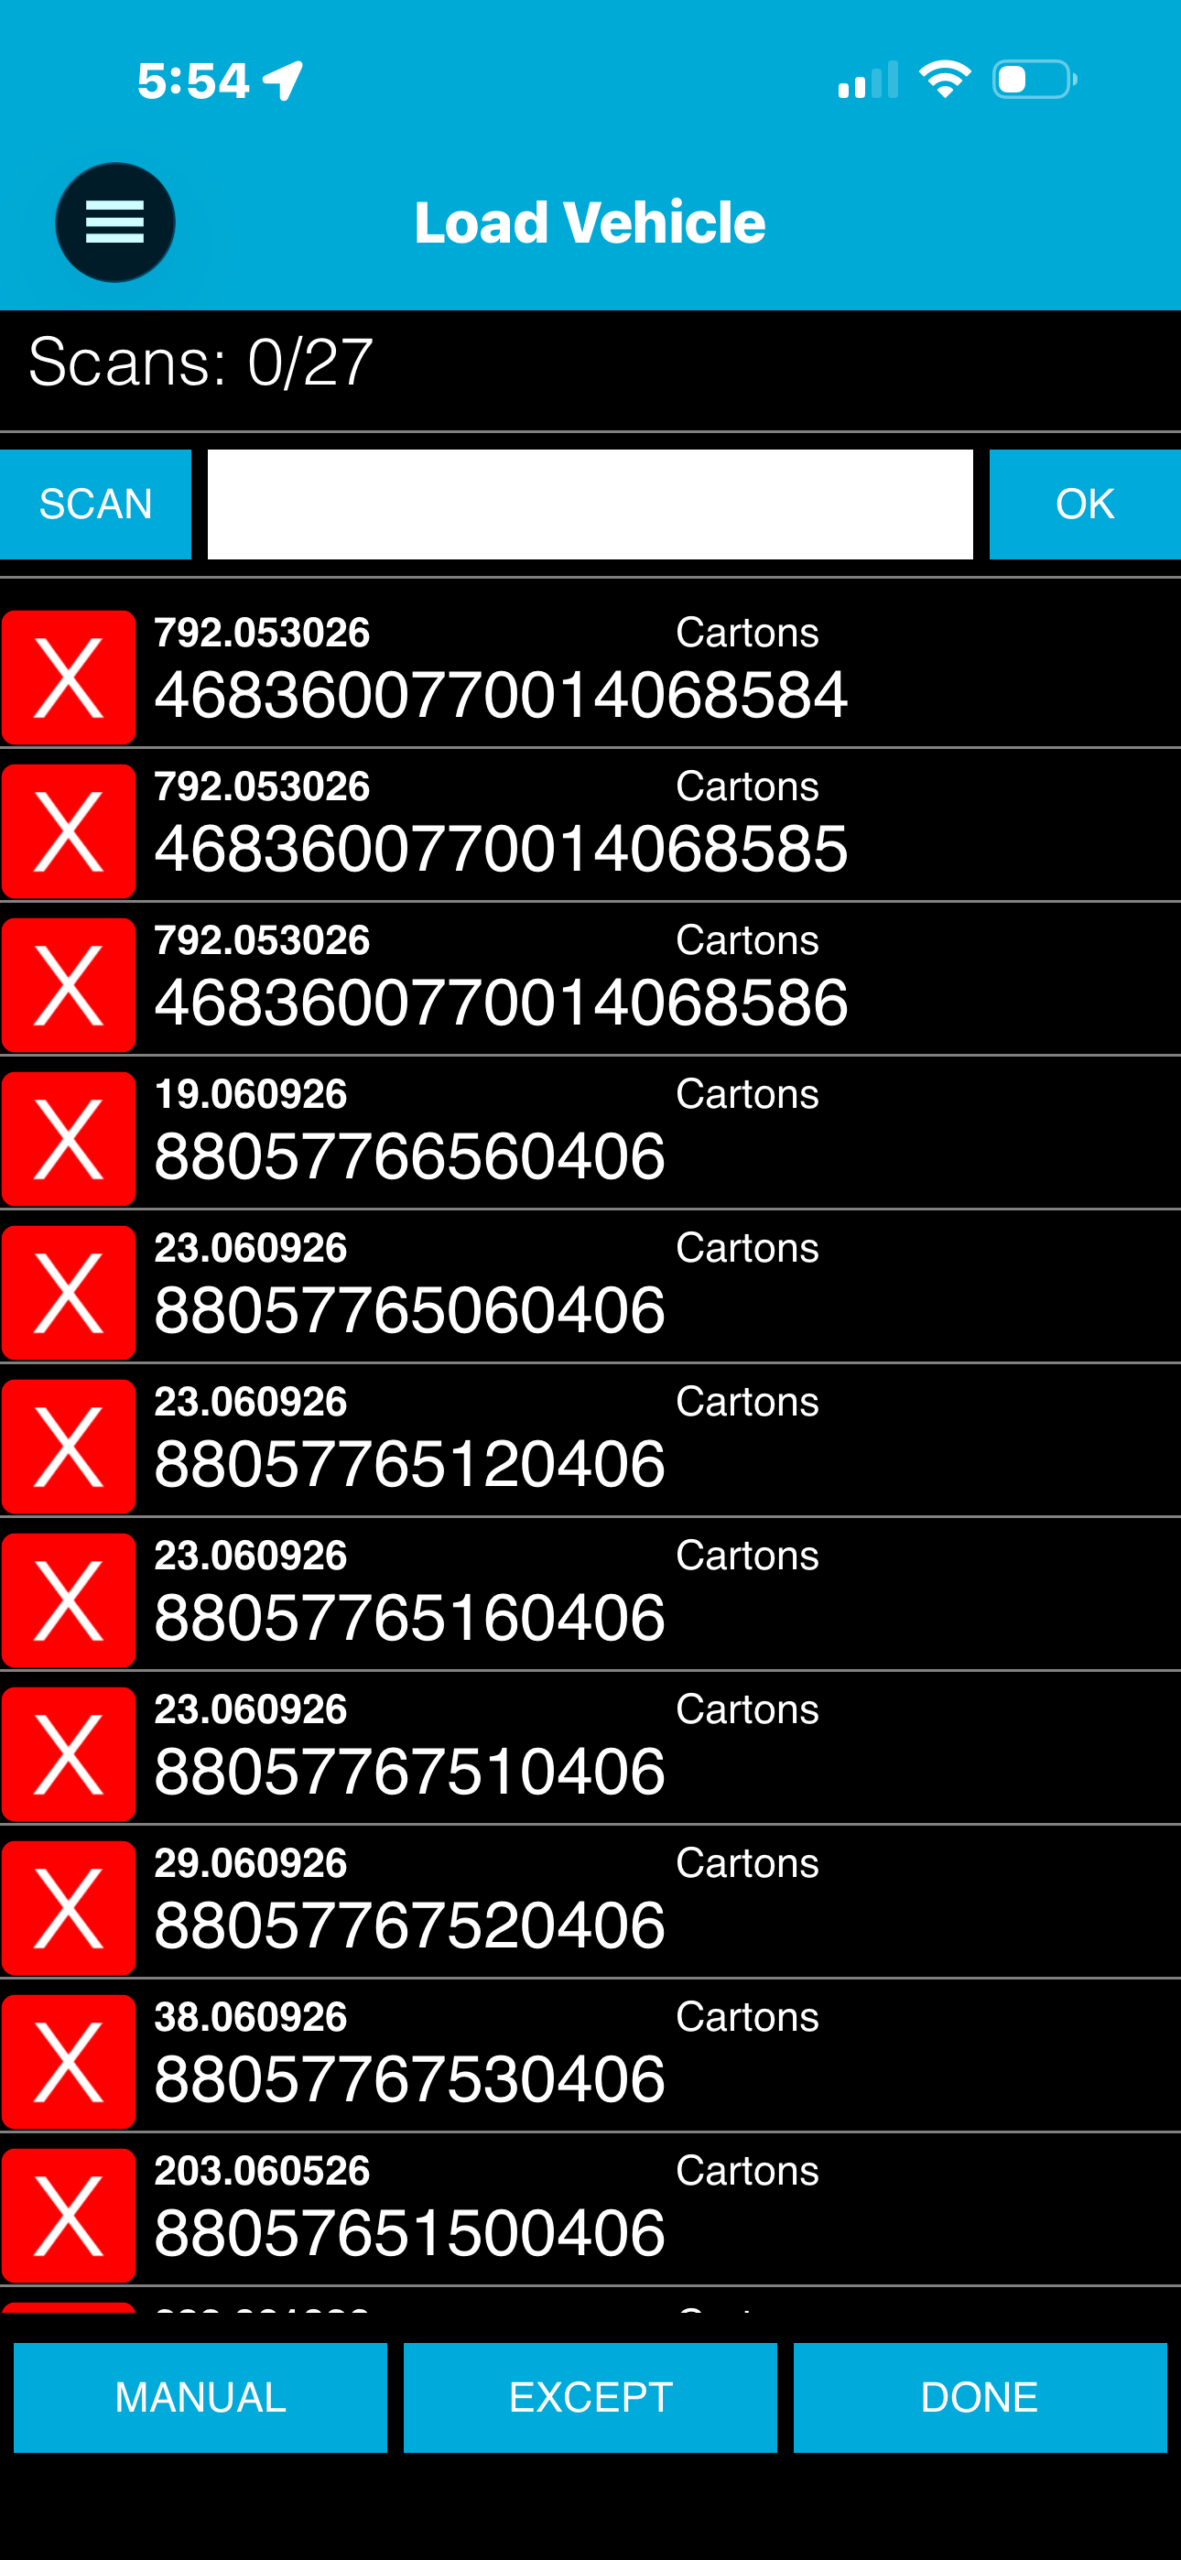
Step Example: Scan Packages
Use the Scan button to scan every package assigned to your route. Green scans confirm the package registered correctly.
Step Example: Commit Load Scans
After tapping Done, confirm the load scans by selecting Yes when MobileTek asks you to commit the scans.
Do It Now:
- Select the Load Vehicle icon
- Tap Scan
- Scan all route packages
- Confirm every scan turns green
- Tap Done
- Select Yes to commit load scans
- Open Scheduled Orders and confirm deliveries appear
Important Pop-Ups
- If MobileTek asks, “Would you like to commit these load scans?”, select Yes.
- If MobileTek says packages have not been scanned and asks if you want to continue, select Yes.
- After selecting Yes, allow MobileTek to refresh before checking Scheduled Orders.
Common Mistakes
- Not using the Load Vehicle icon
- Forgetting to tap Scan
- Leaving before scans turn green
- Not tapping Done after scanning
- Not selecting Yes to commit load scans
- Leaving before Scheduled Orders refresh
- Not confirming deliveries appear before moving to navigation
What Happens If You Don’t:
If load scans are not completed and committed correctly, packages may not register to your route, scheduled deliveries may not appear correctly, dispatch may lose visibility, and delivery problems may happen later in the route.
If load scans are not completed and committed correctly, packages may not register to your route, scheduled deliveries may not appear correctly, dispatch may lose visibility, and delivery problems may happen later in the route.
Success Check
You should now:
- Know how to start the Load Vehicle process
- Know how to scan packages assigned to your route
- Understand that green scans mean the package registered
- Know when to tap Done
- Know to select Yes when committing load scans
- Know how to confirm scheduled deliveries appear
- Be ready to move on to the map and navigation workflow
Need Help?
If scans do not turn green, packages appear missing, or Scheduled Orders do not refresh correctly, contact dispatch before leaving the warehouse.
If scans do not turn green, packages appear missing, or Scheduled Orders do not refresh correctly, contact dispatch before leaving the warehouse.
Scan the route packages. Commit the load scans. Confirm Scheduled Orders before moving to the map.
Continue to Lesson 3 →